Nowadays, people are often changing their computers and laptops with the latest configurations to keep everything up to date on their lives. Moreover, to support the latest software and apps, you must upgrade your computer newest specifications in order to use those cool features. So, it is quite understandable if you decide to sell your old MacBook to get the latest version of it.
And the best thing to do with the old MacBook computers is to sell them or donate them to the next person. But it is not that easy as you think because deleting the files and folders from the computer may be easy but a simple deletion won’t really get your data and information deleted permanently from your system. That’s correct, using any data recovery software available on the internet can restore your files back on the computer and it will be a huge threat to your personal life if those files and data such as bank statements, medical records, private pictures and emails, etc. falls on some wrong hands. So, to resolve this issue, we have come up with few solutions that we will discuss on this tutorial on how to wipe mac clean.
How to Wipe Mac Clean with SafeWiper?
Part 1. Deleting all files and folder manually.
This part works for those who has very smaller data collection on their MacBook. In that case you can use the following steps to remove the files from your computer.
Step 1. Turn on your Mac and head on to the main hard drive of your computer.
Step 2. Select the files using your mouse and simply delete them from your computer.
Step 3. In order to select all files, you can press Command + A key together and press delete to remove those files.
Cons –
- Most unsure way to delete files.
- Time consuming method if you have huge data collection your computer.
Part 2. Format your Mac Computer.
Formatting is the best way to delete all files, folders, software and other private data from your computer. It will completely wipe your system and will make your computer totally fresh as new. Learn how to do that –
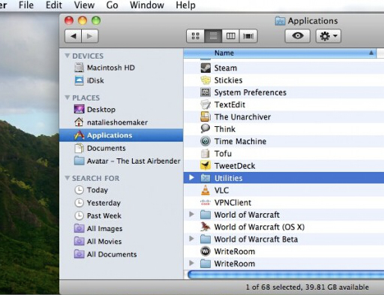
Step 1. Start the Finder menu and from the left side panel, choose Applications.
Step 2. From the right side panel, select “Utilities” followed by Utilities again.
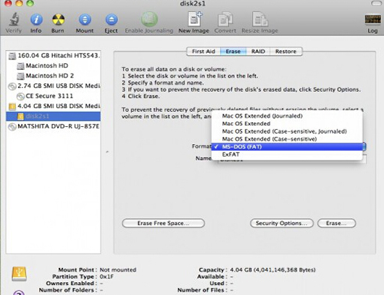
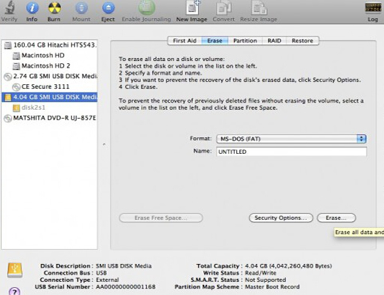
Step 3. Now select the hard drive name that you wish to format and click on “Erase” to start the process.
Step 4. Select the format type such as MS-DOS and give your hard drive a new name followed by clicking “Erase”.
Done! You may restart the computer after the operation is finished and you will find your hard drive empty.
Cons –
- Deleted files are easily recoverable using any free data recovery software.
- Not a safe method if you have secret files stored in your computer.
Part 3. Wipe Mac computer clean using Data Wiper
To overcome the cons discussed in other methods, you should use a professional data erasing tool. In this part, we will be using SafeWiper Mac Data Wiper which a marvelous little program that can erase all the files and folders from your computer beyond recovery. It is 100% guaranteed that the files deleted using Data Wiper program cannot be recovered using any professional data recovery software at all. To make sure all the files are deleted permanently, this program overwrites the erased data over seven times making the deletion process absolutely everlasting. It is the safest way to erase data from your computer before selling or giving away your Mac to anyone.
Let’s see how this program works efficiently
Step 1. Install the software on your Mac computer and launch it to start the deletion process.
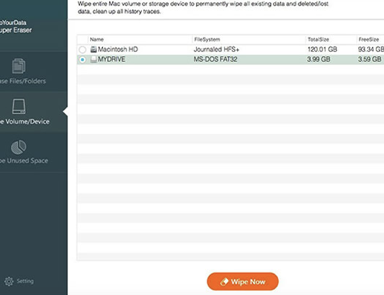
Step 2. This program offers to choose whether to delete individual files and folders or wipe an entire hard drive which is one of the handiest feature provided in this tool. So, if you are selling your Mac then it is recommended to choose “Wipe Volume/Device”.
Step 3. Now choose the hard drive name that you wish to wipe forever and click on “Wipe now”.
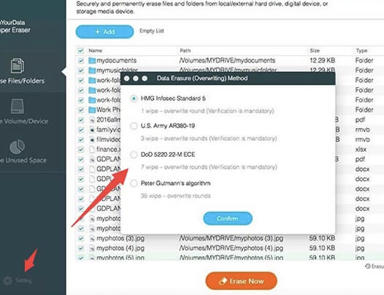
Step 4. This program provides four types of data deletion techniques but if you are not sure which option to choose then select the third option and click on “Confirm”.
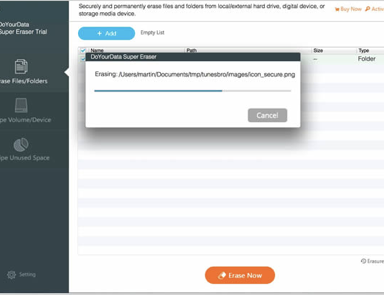
Step 5. The software will start wiping your entire hard drive automatically and you should wait patiently until the process is finished.
Success! You may now restart your computer and you will find totally empty hard drives.
Conclusion:
Taking precautions while selling or donating your Mac computer should be always a top priority in order to protect your identity and information stored on your Mac. The first two methods are only recommended if you are using a personal Mac for yourself but if you are giving away your computer to a total stranger then make sure to permanently delete all the files and folders from your computer by using Data wiper program.

