To start with your own self-hosted blog you need two things Domain name and Hosting. Domain name is basically the URL of the website like mine is technofall.com. Next is the shared server space which is termed as hosting where you will actually host all your website data/files. Now the question that arises is how to configure domain and hosting. By configuration I mean when someone types in your domain name in the address bar, he or she should be redirected to your hosting/server where all the files are stored. So basically we need to give some information about the hosting to the domain.
Buying domain and hosting
Before configuration let me tell you some important steps/tips before buying.
- Try not to go for cheaper hosting as they will have greater downtime and your website will load slow
- If you are planning for multiple websites, then go for multi-domain hosting or a VPS if your budget is higher. This will help you in long term
- Next to check the availability of domain name you can always visit this website or may be use the hosting provider’s website for it. Ofcourse it is subject to availability
- Try to go for .com domain and a shorter name as people tend to remember that easily
- While purchasing hosting the first question that will pop up is, would you like to buy a new domain or use an exisitng one, choose accordingly
- The greater the tenure of hosting the cheaper will be the cost per month
- Always buy using a discount code. Contact me for discount code at: karan@technofall.com or comment or Facebook me. I will get you the best offer that you can’t refuse
- Some providers only accept credit cards while others accept debit card and netbanking too
How to configure domain and hosting | Bluehost India?
Now to start with, we will take an example of Bluehost India which is basically hosting provider company. You can get all sorts of hosting from shared to VPS. We will start with single domain hosting which can host one website only and then move on to multi-domain hosting.
Note: No matter which hosting or domain provider are you using, the setup is pretty much same for all.
There can be two conditions :
- You bought the domain and hosting from the same provider, which is the best thing to do as the domain cost is discounted for new account.
- The domain and hosting are purchased from different provider
For both the cases the settings are almost similar. In the second case you can go ahead and transfer the domain name with the new hosting provider if you want. We will not talk about how to shift domain from one provider to another, google that. So let us see how to configure domain and hosting.
- Log in to the account from where you purchased hosting.
- Next search for what is called the “Name Servers” which is the name of your server. An example for bluehost will be something like ns1.cp-in-8.webhostbox.net, ns2.cp-in-8.webhostbox.net (Normally it is in this format – ns1.serviceprovider.com, ns2.serviceprovider.com or may be .in, .net). Your’s can be totally different so please make sure you check it properly.

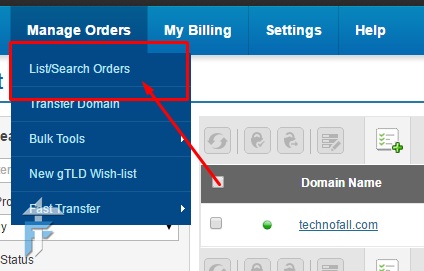
Link Search orders bluehost India - For bluehost you can find all the settings in Manage Orders – > List/Search orders. Next just select the domain name. While purchasing make sure you enter the correct domain name or else you will have to cancel and buy it again. I know its annoying, earlier you could change it easily.
- Next you will see the main dashboard where you will find the Name Server Details.
- After you have got the two name servers, time to enter it in the domain settings.
- If you have bought the domain from other provider then login to that account, or if it from the same provider then just go into domain settings.
- Search for Name server option in domain settings. The location to setting is different with all the providers.
- Next you will get like 4-5 text box with may be pre-entered name servers. Just delete those default ones and enter the name servers that you got from the hosting account.
- After this, the update of name servers may take as long as 48hrs.
You can always check for the name server update on who.is website. Or may be ping your domain name and it should return reply with the new server IP. To see the changes at your end you may need to delete cache of your browser or open CMD and type “ipconfig /flushdns” or restart your router. So basically this will answer your question how to configure domain and hosting. Next you need to setup the website for which you can use ready made CMS like wordpress or others with their one click installation available. There can be exceptions in setting and some hosting provider may need to point your domain directly to the server IP. If that is the case then you can always ask for their help and they will guide you over phone/email.
So these were the steps on how to configure domain and hosting. Sometimes this can be a complicated thing if you miss out any step. Once you get a hang of it, things will get easier. If you still are not confident or you have any doubts on how to start with your own blog, please write to me or mention it in the comment section below.